
Make this t-shirt, you must.FREE Baby Yoda SVG below 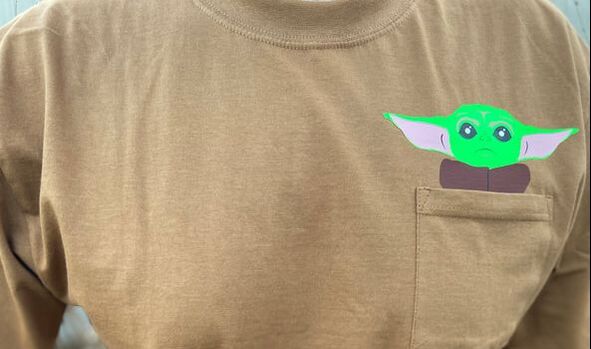 The only thing bigger than Disney Plus right now is the little hero that has sprung forth from it's flagship show, The Mandalorian. From the first day that people got a look at the little cutie named, the Child (aka: Baby Yoda), they couldn't get enough. Etsy shop owners instantly created ornaments, trinkets and digital files of Baby Yoda for the public to purchase. So why not make your own t-shirt of "Baby Yoda" and be the envy of the entire galaxy... or at least your town? Here's what you'll need young Padawan... MATERIALS
STEP 1: Download and then Upload the ImageIf you haven's snagged (a word that I use not often enough) your free copy of the Baby Yoda (aka: The Child) .SVG yet, then click up above to download it. One quick point: we do not claim ownership over any likeness of the character in this tutorial. This is simply an educational guide to create a shirt for your own personal use. In order to download the image, you can click the Baby Yoda pic or CLICK HERE. A new window will open with a picture of the image. Right Click (or Ctrl + Click for Mac) and save the file to a memorable location. Note, the saved file will appear as a Windows Explorer icon and when you click it, the default program to open it will be a web browser. Trust us, it is an SVG file and will open in Cricut Design Space, Silhouette Studio Designer (or higher). Once you have the file saved onto your computer, go into your favorite die cut software and upload the image. If you need assistance with Cricut Design Space, we offer some tutorials. STEP 2: Cut the Vinyl Pieces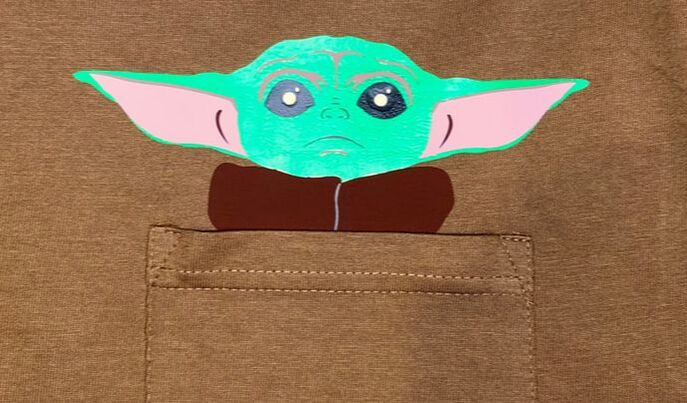 The free Baby Yoda SVG file is comprised of 6 layers. When uploaded to Cricut Design Space (software we used for the cut files), each layer is separated/grouped by color. Be sure to attach the various images appropriately for your project. To clarify, let's take a look at Baby Yoda's forehead and the top of his ears. You'll want to 'ATTACH' these images in Cricut Design Space. Attaching them, keeps their location as it is shown in the design. This means that they're space exactly as their shown. You'll want to do this for intricate details as it will help with assembly time as well as make positioning the vinyl easier. For instance, we didn't need to ATTACH the Pink ear parts because that would simply just space them out and, in essence, be wasting our costly heat transfer vinyl. Since the pink Baby Yoda ear pieces are relatively big and are placed easily on the image (more on that later), we can have them placed closely for the cut. 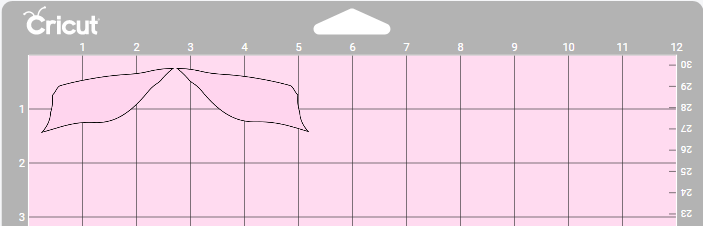 Baby Yoda Pink Ears Can Be Die Cut Closely and Then Cut Apart For Assembly 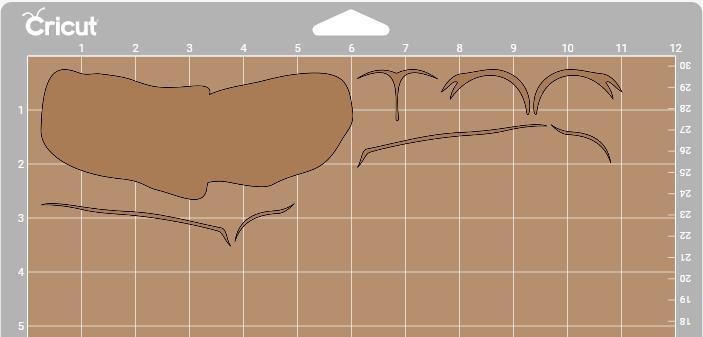 Un-Attached Images on Light Brown Layer As you can tell, the images are all on the same cut layer but are laid out as to save vinyl and not to save [assembly] time. 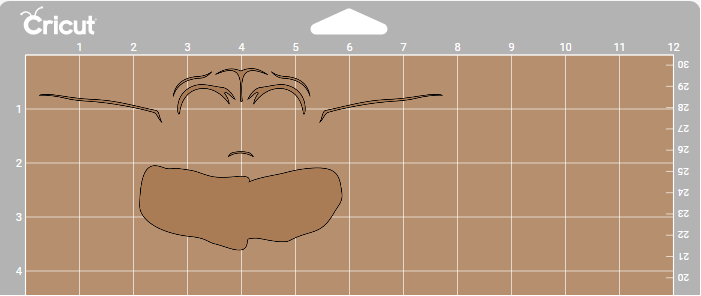 Attached Images on Light Brown Layer Soon I'll show you the order to assemble the pieces, but before I do so, I'll make one note about this layer. We cut the images as shown in the second, 'attached' Cricut photo. For heat transfer assembly, however, we actually cut and separated the bottom 'scarf' piece from the Baby Yoda head details/wrinkles. The reason that we cut separated the scarf from the other details is because we assembled this design using a t-shirt with a pocket (which are much harder to find than anticipated, FYI). We needed to tuck the bottom part of the scarf design into the pocket of the shirt. The only way to do this was to trim the vinyl heat transfer. Last Detail before you send the file to be cut, RE-SIZE IT. The size of our Baby Yoda head was 6-3/8" from ear tip to ear tip. In hindsight, I wish we made it around 7 inches ear-to-ear. What you'll want to do is measure from the center of your shirt's pocket to the seam of the sleeve. Multiply that by two and then make sure that you DON'T exceed that number. In our case, the pocket center to sleeve stitching was 5". As long as our ear-to-ear measurement was less than 10" we'd be fine. However, you still want to ensure that the 'scarf' fits in the pocket as well. For an Adult Large shirt, the 7" ear-to-ear length works. When you cut, DON'T FORGET TO MIRROR ! STEP 3: Weed the VinylAfter you've cut all 6 layers of you'll need to weed out the unnecessary parts. Using your weeding tool, pick a corner, slide the edge between the vinyl and backing and then begin to peel. Peel it slowly and at a 45 degree angle. Look carefully, especially with the white layer, as there are tiny parts that may not stick to the backing. We had to hold down (with tweezers) the tiny white circle as it wanted to be lifted with the vinyl scrap. Rule of Thumb: the larger the image size, the easier it is to weed. Or, as Yoda would say (if he crafted with vinyl) "Easier weeding is, if larger the image." Now that all of the images are cut and weeded, you're almost ready to assemble. As we mentioned before, if you decided to not 'attach' certain layers then you'll want to separate them. For instance, we decided to keep the Pink ear parts close together. After we weeded, we carefully cut images apart. Again, we're cutting through the clear backing and nothing more. When completed, you'll have two separate ear pieces on their own backing. STEP 4: Assemble the PiecesOrder of Assembly of the Vinyl Layers -> GREEN - LIGHT BROWN - PINK - DARK BROWN- BLACK -WHITE We used the Cricut Easy Press 2 to heat up the vinyl for the image transfer. Easy Press Setting- 315 degree F, 30 second timer. Material was standard heat transfer vinyl on a 100% cotton t-shirt, heated on the Cricut Easy Press Mat. First, the Green. For this first layer we pressed for 20 seconds and not the full 30s. This is because there will be 5 more layers on this head, thus well exceeding the required 30s time for adhesion. Multi-layering is a balancing act. You want it hot enough so that you can peel off the backing while not using the full requisite heat time. 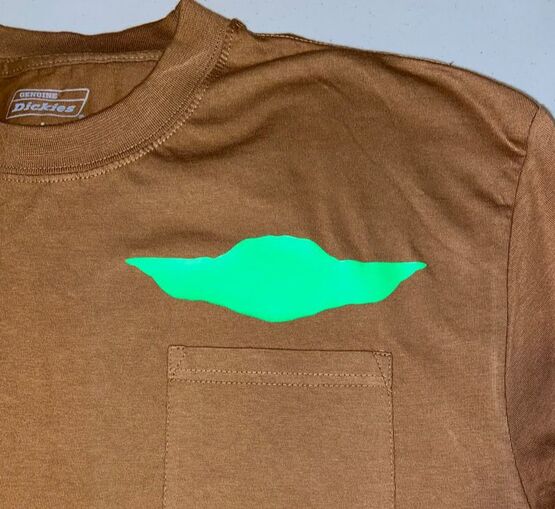 Next, we place the brown layer over the green and heat for 15 seconds. While warm, slowly peel off the backing. We had separated the scarf from the other details and slid part of it into the shirt pocket.  We adhered the pink and black layers at the same time. This allowed for faster assembly and less heating. See how easy it is to locate the location of the pink ears? They nest snuggly under the light brown part of the ear. Before we apply heat press, we cover with clear backing remnants to protect the uncovered pieces. If you accidentally threw them out, then use parchment paper. Heat 15 seconds and then warm peel off the backing. 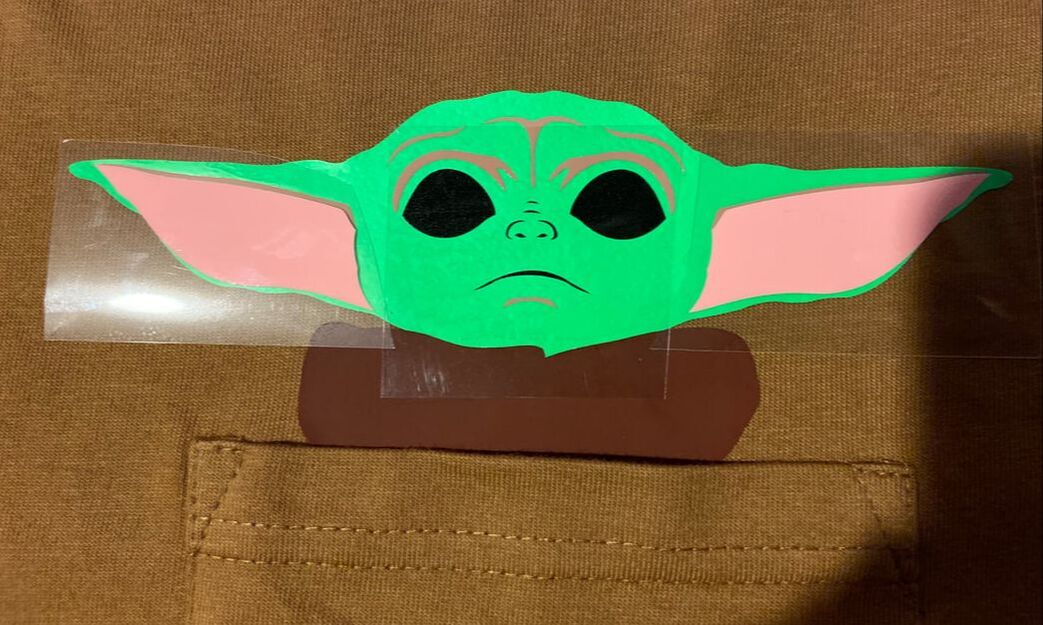 Again to save time, we combined the Dark Brown line on the scarf, the ears (not shown in image- Oops) and the White of the eyes. After you've place the parts, cover the entire image with the clear backing or parchment to protect from potential heat damage. Heat 15 to 20 seconds and warm peel slowly off the backing. 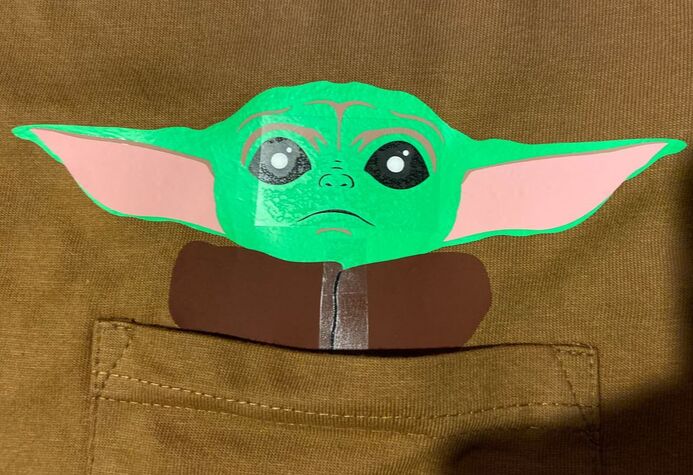 When all of the images are transferred, flip over the shirt and heat the back of the shirt for 15 seconds.
Flip shirt back off so the image faces you, and warm peel off the clear backing. Strong is the force of the heat transfer vinyl, it is. However, wash it only after 24 hours, and inside out, you must. Have Fun and please send us photos of your creations or tag us on Instagram @wannacraftcom. Want a Free copy of the entire Baby Yoda body? E-mail us at gottentf@gmail.com.
0 Comments
Leave a Reply. |
Similar Tutorials
|
